YAY...I have my first follower and comment. Thank you ShinyShiny Designs Company. http://theshinyshinydesigncompany.blogspot.com/
*******************************************************************************
I am really struggling to come up with new and unique ideas that will allow me to use my talents to make a little extra money. You hear about these people that lose their jobs and go out and make as beaded necklace, or a cupcake out of a leftover hotdog or a coffee mug out of a hub cab and become instant millionaires. Well, I am waiting for my turn!
I have been doing one craft or another for over 30 years...
I have taught tole painting and worked the craft fairs. Made OK money if, but not enough to quit my full time job.
I have sewn, painted murals, opened a small gift shop, sold things on Ebay...now trying on Etsy. I have made 3D modelled fondant cakes...did really well with that, but health issues would not allow me to keep the pace up. SOOOO, it is back to the drawing board.
I am really interested in lampwork beads and have found a class nearby. But, you know the old saying..."It takes money to make money". Well guess what..."I AIN'T GOT NO MONEY!!!!!"
I keep thinking and praying that one day that perfect idea will come to me and it will be my turn. Until then, I guess I will keep making things that I like and enjoy...keep searching the internet for new ideas...and enjoy my newest grandaughter. She makes me smile and laugh and that is the most important thing in life!

Friday, October 28, 2011
Monday, October 17, 2011
Upcycled Fleece Pants for Baby
My husband tried to throw away this fleece jacket two or three times and I kept taking it out of the garbage. Reduce, Reuse and Recycle I keep telling him. I decided that I would make a pair of fleece pants for Kessie. She will be 7 months old on Wednesday and will be crawling soon. She needs something to keep those cute little legs warm this winter on my cold floors. I hope you can use this tutorial for ideas for your little one. I think I will be making the dog a winter coat out of the remainder of the fleece jacket, and who knows what else!

I started by placing a pair of sweat pants that fit Kessie now and made a pattern on two pieces of 8 1/2 x 11 paper taped together end to end.

I traced around them and allowed a 1/2" seam on each side, an inch at the top and the bottom to allow for elastic. Then cut the pattern out.

I used the sleeves of the jacket and placed the straight side of the pant leg on the fold of the fabric and only cut the top, bottom, crotch and inside seam out of the fabric. You can cut out around the entire pattern if you are using another portion of the jacket.

Place right sides of the fabric together and sew the inside leg seams together using a 1/2" seam allowance.


Trim seams to 1/4" and zig-zag. If you have a serger, it would be perfect to use for this project.


I always double stitch the crotch seam. This is something that I learned from my Grandmother and it sure has saved some embarrasment a time or two.

You may want to try it on your little one at this point to make sure that it is not too long waisted. It is easier to make the adjustment before you turn down the top for the elastic encasement.
Zig-Zag the around the top edge of the waist and the bottom edge of each pant leg. Turn under 1" at the waist and 3/4" on each pant leg. Stitch around each using a straight stitch. Leave an opening of about an inch to be able to feed the elastic through.

I used 3/4" wide elastic for the waist and 1/2" wide for the ankles. Feed the elastic through the opening using a safety pin. Try on your little one, or measure their waist and ankles if that is easier.


Draw the elastic up to the correct length, pin or hold together and zig-zag back and forth several times to hold toghether. Trim, feed into the pants and stitch the opening closed.


I added hot pink bows to each leg and the waist to give them some color and make them more girly. I think they are cute with the hot pink onesie and hairbow. Now that I think about it, I may have to make her a raglan sleeve jacket out of the remainder of the fabric. Poor doggy. He may have to go cold a little longer.

Saturday, October 15, 2011
Baby Shoes for Halloween
After I made Kessie her Spider Tutu Costume...I decided that she needed some shoes to coordinate. I have been wanting to make some anyway. I think they turned out really cute!

I used McCalls pattern 6342. It has 10 different versions in one pattern. The pattern is normally $18.95, but I got it at Hobby Lobby when they were on sale for .99. I used view "H" with a minor change. I used ribbon to tie them with instead of the sewn in version.
They are made from black felt (made in South Carolina...YAY) and lined with an orange cotton print. I made ribbon roses for the toes and tied with the matching ribbon.
Sunday, October 9, 2011
New Pillows on Etsy
I have been working all day on graphic designs for new pillows for my Etsy shop. I have not sold anything yet...Oh well. Maybe soon...


Tuesday, October 4, 2011
Little Spider Halloween Costume and TuTu Tutorial
I found the cutest onesie at Carolina Mall in the Lee store for Kessie's first Halloween costume. I have made a toulle tutu, leggings and a headband to complete the outfit. She is going to be so cute!

I cut the toulle 4 inches wide and about 14" long. I just quartered the width of the toulle evenly. I used the rotary cutter, but scissors work just fine also. You may want to adjust these measurements for a longer tutu. Keep in mind, this is for a 6 month old.
You need to measure the child's waist. I subtracted about an inch, lapped the ends about an inch and then stitched them together. I wanted it to be tight enough to stay up, but not too tight. As you add the toulle, it stretches out just a bit.
My husband made me an adjustable stand to hold the elastic while I tied the toulle on. It was really easy made from a scrap 2x4 and a dowel rod. It sure made the process alot easier. If you do not have access to making one of these, a bucket, pot, anything the right size will be helpful.


 Here is the completed TuTu. If it is too large when you are finished, you can always remove a few pieces of toulle and ribbon and take up the elastic.
Leggings
I made Kessie a pair of leggings from a pair of ladies socks and wanted some to go with her Spide outfit. I found the cutest orange and black stiped ones with BOO on the top. They were children's sock and too big for here, so I decided to turn them into leggings. For these you will need:
1 pair of larger childs or adult knee socks
Sewing machine and thread to match
Scissors
 You will start by cutting the socks apart...I know it is kind of scary, but just go for it!


You will cut the heel and the toe portions away and discard those. The foot of the sock becomes the cuff that will fit around the ankle. The top cuff will fit around the baby's thigh. If the sock is extremely long, you may wish to cut some of the length off so that it is not too "bunchy".
 Determine if the cuffs will be too large for the baby's ankle. You may need to also cut this down. I took about a 3/4" seam, trimmed it down a bit and then zigzagged the edges. I do not have a serger. It would work great for this project.


I wanted to share the process with my first tutorial. It was really fun, simple and fast.

These are the items that you will need:
Onesie of your choice (If you cannot find one with a design on it, you can always stamp it with a simple sponge stamp and paint, add an iron on transfer, etc)
1 yard black toulle (You will need more for an older child)
1 yard orange toulle
orange ribbon
black ribbon
elastic
scissors and rotary cutter
cutting mat and plastic ruler cutting guide
Sewing machine or needle and thread
stretchy woven headband (I found 4 for $1.00 at Family Dollar)
plastic spiders (I found a pack of 25 at Dollar General for $1.00)
TuTu
I cut the toulle 4 inches wide and about 14" long. I just quartered the width of the toulle evenly. I used the rotary cutter, but scissors work just fine also. You may want to adjust these measurements for a longer tutu. Keep in mind, this is for a 6 month old.
You need to measure the child's waist. I subtracted about an inch, lapped the ends about an inch and then stitched them together. I wanted it to be tight enough to stay up, but not too tight. As you add the toulle, it stretches out just a bit.
My husband made me an adjustable stand to hold the elastic while I tied the toulle on. It was really easy made from a scrap 2x4 and a dowel rod. It sure made the process alot easier. If you do not have access to making one of these, a bucket, pot, anything the right size will be helpful.

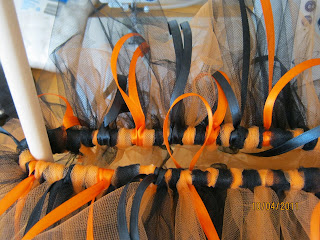
Place elastic around the two dowel rods. Now you are ready to begin tying the toulle and ribbon around the elastic. I form a loop with the toulle, place it to the back of the elastic and then pull the ends through.


Be sure to tighten them fairly snug as you go and keep pushing them together so that the elastic does not show through. I added the ribbons between every 3 pieces of toulle. You may want to knot the ribbon instead of just using the loop knot. Since it is satin it may loosen while the child is wearing it. I would do a section of toulle and then come back and add the ribbon. You can use as many different colors of toulle and ribbon that you wish.

Leggings
I made Kessie a pair of leggings from a pair of ladies socks and wanted some to go with her Spide outfit. I found the cutest orange and black stiped ones with BOO on the top. They were children's sock and too big for here, so I decided to turn them into leggings. For these you will need:
1 pair of larger childs or adult knee socks
Sewing machine and thread to match
Scissors


Now You have to fold the cuff in half, right side out, pin to the right side of the legging and stitch. I stretch it as I go so that it has a little fullness and to make the leg portion of the sock fit the cuff without any pleats.


I also zigzag around this edge. Turn right side out and you are finished!

How cute is that??!!!
I also made her a hairbow out of the black and orange toulle and ribbons and hot glued some of the plastic spiders onto it.

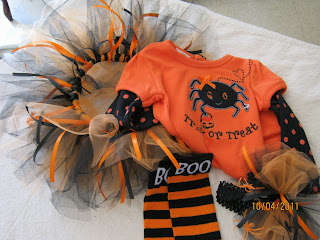
This is the completed outfit. Cutie Patootie!!!!!

Here she is!!
First Post
I am a wife, a mother to two daughters and a step-daughter and a Nana of four beautiful grandchildren. I love creating anything and trying new things. I sew, paint, work with ribbons, fabrics, papers, etc. I love animals and I Love to read!
I owned and operated a custom cake design shop called Bloomin' Cakes for almost 2 years. I specialized in 3D modelled speciality cakes using fondant. It was very successful and I loved it. However, I had to sell the business due to health issues. I miss it very much...especially my customers!
I am trying to keep busy and generate a little revenue by starting an Etsy Shop. http://www.nanaandmecreations.etsy.com/ so far, I am making Victorian inspired graphic design pillow covers with handpainted touches of color. I love Victorian, French Country and Shabby Chic.
I hope to post tutorials as I create new things. I have just completed a toulle tutu for my six month old grandaughter Kessie. She is going to be a spider...sort of! Stayed toned...that is my next post.
I look forward to making new friends, sharing ideas, resources, successes and joys!
Lisa
Subscribe to:
Posts (Atom)